
해당 글은 Vite 프로젝트를 Next.js 로 마이그레이션 하기 위해 거쳐야 할 단계를 소개합니다.
제가 겪었던 오류도 포함하여 구성이 되어 있습니다.
SOPT 35기 앱잼에서 만든 Cocos 프로젝트에 적용하는 내용을 생생하게 담은 글입니다.
Upgrading: Migrating from Vite | Next.js
Learn how to migrate your existing React application from Vite to Next.js.
nextjs.org
넥스트 공식 페이지 내용을 가져왔습니다.
우선 궁금할 수 있는 내용부터 소개해보자면,
🤔 왜 잘 구현된 React 프로젝트를 Next.js 로 전환할까?
기존 cocos 프로젝트는 react 용 기본 Vite 로 빌드하고 있습니다. 순전히 클라이언트 측 애플리케이션으로, Single-Page Applications(SPAs) 입니다. SPA 는 초기 페이지 로딩 시간이 느리다는 특징을 가지고 있습니다.
1. 브라우저는 코드가 데이터를 로드하기 위한 요청을 보내기 전에 React 코드와, 전체 번들이 다운로드되고 실행될 때까지 기다린다.
2. 새로운 기능과 추가 종속성이 추가될 때마다 코드가 커진다.
두가지 이유로 초기 로딩 시간이 느려진다는 단점이 있습니다.
자동 코드 분할(Auto Code Splitting) 이 불가능하다.
느린 로딩 시간 문제는 코드를 분할하면서 관리가 가능하지만, 수동으로 분할하면 오히려 성능이 더 나빠질 수 있습니다.
수동으로 코드 분할을 하면 의도치 않은 네트워크 워터폴(Network Waterfall)을 발생시킬 수 있습니다.
Next.js 는 라우터에 내장된 자동 코드 분할을 제공합니다.
네트워크 워터폴(Network Waterfall)
클라이언트-서버 간의 요청을 연속적으로 수행(Sequential Requests)할 때, 성능이 저하되는 일반적인 원인이 됩니다.
SPA(Single Page Application)에서 데이터를 가져오는 일반적인 방식은 초기에 렌더링한 후, 컴포넌트가 마운트 된 후에 데이터를 가져옵니다.
이런 방식에서는 자식 컴포넌트가 데이터를 가져오기 위해 부모 컴포넌트의 데이터 로딩이 끝날 때까지 기다려야 하기 때문에 네트워크 워터폴 문제가 발생할 수 있습니다.
-> Next.js 에서는 클라이언트에서 데이터를 가져오는 것도 가능하지만, 데이터 패칭을 서버에서 수행하도록 변경할 수도 있기 때문에, 클라이언트 - 서버 워터폴 현상을 제거할 수 있습니다.
빠르고 의도적인 로딩 상태 관리
Next.js는 React Suspense 를 통한 스트리밍 기능을 기본적으로 지원하여, UI 의 어떤 부분을 먼저 로드할지, 어떤 순서로 로드할지 의도적으로 결정할 수 있습니다. 이를 통해 네트워크 워터폴을 발생시키지 않고 효율적으로 데이터를 가져올 수 있습니다.
-> Layout shift (레이아웃 시프트, 레이아웃이 갑자기 변경되는 현상)을 방지할 수 있습니다.
데이터 패칭 전략 선택
Next.js는 페이지 및 컴포넌트 단위로 데이터 패칭 전략을 선택할 수 있도록 지원합니다. 필요에 따라 빌드 시(Build Time), 요청 시(Server Request Time), 또는 클라이언트에서(Client-side) 데이터를 가져올 수 있습니다.
Built-in 최적화 기능
이미지, 폰트, 서드파티 스크립트 등은 웹 애플리케이션에서 성능에 큰 영향을 미칠 수 있슨데, Next.js 는 이러한 요소들을 자동으로 최적화하는 내장 컴포넌트(Built-in Components) 를 제공합니다. 개발자가 별도로 최적화할 필요 없이 더 나은 성능과 사용자 경험을 제공할 수 있도록 돕습니다.
미들웨어 (Milddleware)
Next.js 에서 미들웨어는 요청이 완료되기 전에 서버에서 코드를 실행할 수 있도록 해주는 기능입니다.
예를들어, 로그인이 필요한 페이지에 비로그인 사용자가 접근할 경우, 인증되지 않은 콘텐츠가 잠시 나타나는 문제(Flicker: 콘텐츠가 깜빡이는 것)를 방지하고 로그인 페이지로 즉시 리디렉트할 수 있습니다.
🗃️ 마이그레이션 Vite to Next.js
기존 라우터를 마이그레이션하지 않고 순수한 클라이언트 측 애플리케이션(SPA)으로 유지합니다.
-> 마이그레이션 프로세스 중에 문제가 발생할 가능성을 최소화하고 병합 충돌을 줄이는데 도움이 된다.
1단계 : Next.js 종속성 설치
npm install next@latestcocos 는 pnpm 이기 때문에, 다음 명령어로 진행하였습니다.
pnpm install next@latest
2단계 : Next.js 구성 파일 만들기
next.config.js 파일을 만듭니다.
/** @type {import('next').NextConfig} */
const nextConfig = {
  /* config options here */
}

module.exports = nextConfig
cocos는 typescript 기반이기 때문에, next.config.ts 파일을 만듭니다.
import type { NextConfig } from 'next'

const nextConfig: NextConfig = {
  /* config options here */
}

export default nextConfig
그리고, 기존에 vite.config.ts 에 있던 내용을 그대로 next.config.ts 에 적용시키는 과정이 필요합니다.
기존 vite.config.ts
import { defineConfig } from "vite";
import react from "@vitejs/plugin-react-swc";
import { vanillaExtractPlugin } from "@vanilla-extract/vite-plugin";

// https://vite.dev/config/
export default defineConfig({
  plugins: [react(), vanillaExtractPlugin()],
  resolve: {
    alias: [
      { find: "@api", replacement: "/src/api" },
      { find: "@asset", replacement: "/src/asset" },
      { find: "@common", replacement: "/src/common" },
      { find: "@page", replacement: "/src/page" },
      { find: "@route", replacement: "/src/route" },
      { find: "@shared", replacement: "/src/shared" },
      { find: "@style", replacement: "/src/style" },
      { find: "@type", replacement: "/src/type" },
      { find: "@store", replacement: "/src/store" },
      { find: "@auth", replacement: "/src/auth" },
    ],
  },
});
next.config.ts
import { createVanillaExtractPlugin } from "@vanilla-extract/next-plugin";
import type { NextConfig } from "next";
import * as path from "node:path";
const withVanillaExtract = createVanillaExtractPlugin();

const nextConfig: NextConfig = {
  reactStrictMode: true,
  webpack: (config) => {
    config.resolve.alias = {
      ...config.resolve.alias,
      "@api": path.resolve(__dirname, "src/api"),
      "@asset": path.resolve(__dirname, "src/asset"),
      "@common": path.resolve(__dirname, "src/common"),
      "@page": path.resolve(__dirname, "src/page"),
      "@route": path.resolve(__dirname, "src/route"),
      "@shared": path.resolve(__dirname, "src/shared"),
      "@style": path.resolve(__dirname, "src/style"),
      "@type": path.resolve(__dirname, "src/type"),
      "@store": path.resolve(__dirname, "src/store"),
      "@auth": path.resolve(__dirname, "src/auth"),
    };
    return config;
  },
}

export default withVanillaExtract(nextConfig);
3단계 : Typescript 설정 수정하기
Vite로 시작한 앱의 TypeScript 설정 중 일부를 제거하거나 변경합니다.
기존 코드 tsconfig.json
{
  "files": [],
  "references": [
    { "path": "./tsconfig.app.json" },
    { "path": "./tsconfig.node.json" }
  ],
}
기존 코드 tsconfig.node.json
{
  "compilerOptions": {
    "tsBuildInfoFile": "./node_modules/.tmp/tsconfig.node.tsbuildinfo",
    "target": "ES2022",
    "lib": ["ES2023"],
    "module": "ESNext",
    "skipLibCheck": true,

    /* Bundler mode */
    "moduleResolution": "bundler",
    "allowImportingTsExtensions": true,
    "isolatedModules": true,
    "moduleDetection": "force",
    "noEmit": true,

    /* Linting */
    "strict": true,
    "noUnusedLocals": true,
    "noUnusedParameters": true,
    "noFallthroughCasesInSwitch": true,
    "noUncheckedSideEffectImports": true
  },
  "include": ["vite.config.ts"]
}
기존 코드 tsconfig.app.json
{
  "compilerOptions": {
    "tsBuildInfoFile": "./node_modules/.tmp/tsconfig.app.tsbuildinfo",
    "target": "ES2020",
    "useDefineForClassFields": true,
    "lib": ["ES2020", "DOM", "DOM.Iterable"],
    "module": "ESNext",
    "skipLibCheck": true,

    /* Bundler mode */
    "moduleResolution": "bundler",
    "allowImportingTsExtensions": true,
    "isolatedModules": true,
    "moduleDetection": "force",
    "noEmit": true,
    "jsx": "react-jsx",

    /* Linting */
    "strict": true,
    "noUnusedLocals": false,
    "noUnusedParameters": false,
    "noFallthroughCasesInSwitch": true,
    "noUncheckedSideEffectImports": true,

    /*path alias*/
    "baseUrl": "./",
    "paths": {
      "@api/*": ["src/api/*"],
      "@asset/*": ["src/asset/*"],
      "@common/*": ["src/common/*"],
      "@page/*": ["src/page/*"],
      "@route/*": ["src/route/*"],
      "@shared/*": ["src/shared/*"],
      "@style/*": ["src/style/*"],
      "@type/*": ["src/type/*"],
      "@store/*": ["src/store/*"],
      "@auth/*": ["src/auth/*"]
    }
  },
  "include": ["src"]
}
tsconfig의 다음 9가지를 변경합니다
- references 필드에서 tsconfig.node.json을 제거합니다.
- include 배열에 문자열 "./dist/types/**/*.ts"와 "./next-env.d.ts"를 추가합니다.
- exclude 필드를 만들고 ["./node_modules"]를 추가합니다.
- compilerOptions에 plugins를 추가하고 값으로 [{ "name": "next" }]를 추가합니다.
- esModuleInterop 설정을 true로 활성화합니다.
- jsx 설정을 "preserve"로 변경합니다.
- allowJs 설정을 true로 활성화합니다.
- forceConsistentCasingInFileNames 설정을 true로 활성화합니다.
- incremental 설정을 true로 활성화합니다.
Next.js 공식문서는 다음과 같습니다. tsconfig.json
{
  "compilerOptions": {
    "target": "ES2020",
    "useDefineForClassFields": true,
    "lib": ["ES2020", "DOM", "DOM.Iterable"],
    "module": "ESNext",
    "esModuleInterop": true,
    "skipLibCheck": true,
    "moduleResolution": "bundler",
    "allowImportingTsExtensions": true,
    "resolveJsonModule": true,
    "isolatedModules": true,
    "noEmit": true,
    "jsx": "preserve",
    "strict": true,
    "noUnusedLocals": true,
    "noUnusedParameters": true,
    "noFallthroughCasesInSwitch": true,
    "allowJs": true,
    "forceConsistentCasingInFileNames": true,
    "incremental": true,
    "plugins": [{ "name": "next" }]
  },
  "include": ["./src", "./dist/types/**/*.ts", "./next-env.d.ts"],
  "exclude": ["./node_modules"]
}
cocos에 적용한 tsconfig.json
{
  "compilerOptions": {
    "tsBuildInfoFile": "./node_modules/.tmp/tsconfig.app.tsbuildinfo",
    "target": "ES2020",
    "useDefineForClassFields": true,
    "lib": ["ES2020", "DOM", "DOM.Iterable"],
    "module": "ESNext",
    "skipLibCheck": true,

    "moduleResolution": "bundler",
    "allowImportingTsExtensions": true,
    "isolatedModules": true,
    "resolveJsonModule": true,
    "moduleDetection": "force",
    "noEmit": true,
    "jsx": "preserve",

    "strict": true,
    "noUnusedLocals": false,
    "noUnusedParameters": false,
    "noFallthroughCasesInSwitch": true,
    "noUncheckedSideEffectImports": true,

    "plugins": [{ "name": "next" }],
    "esModuleInterop": true,
    "allowJs": true,
    "forceConsistentCasingInFileNames": true,
    "incremental": true,

    "baseUrl": "./",
    "paths": {
      "@api/*": ["src/api/*"],
      "@asset/*": ["src/asset/*"],
      "@common/*": ["src/common/*"],
      "@page/*": ["src/page/*"],
      "@route/*": ["src/route/*"],
      "@shared/*": ["src/shared/*"],
      "@style/*": ["src/style/*"],
      "@type/*": ["src/type/*"],
      "@store/*": ["src/store/*"],
      "@auth/*": ["src/auth/*"]
    }
  },
  "include": ["src", "./dist/types/**/*.ts", "./next-env.d.ts"],
  "exclude": ["./node_modules"]
}
4단계 : Root Layout 만들기
Next.js 의 App Router 에서는 루트 라우트인 app 폴더에 layout 파일이 반드시 필요합니다.
Vite 앱에서는 index.html 파일이 유사한 역할을 합니다. index.html 파일에는 html, hea, body 태그가 포함되어 있습니다.
다음 단계를 거쳐 index.html 파일을 layout 파일로 변환해봅시다.
1. src/app 폴더를 만든다.
2. app 폴더에 layout.tsx 파일을 만든다.
src/app/layout.tsx
import { ReactNode } from "react";

export default function RootLayout({
  children,
}: {
  children: ReactNode;
}) {
  return null;
}
3. index.html 에 있는 태그를 앞서 만든 RootLayout 컴포넌트로 붙여넣습니다.
현재 코드는 cocos 프로젝트 기반 입니다. 주의할 점은 <body> 안에 <div id="root">{children}</div> 로 대체합니다.
div 랑 script 는 주석처리 하고, <div id="root">{children}</div> 로 대체하는 작업만 진행했습니다.
import { ReactNode } from "react";

export default function RootLayout({
  children,
}: {
  children: ReactNode;
}) {
  return (
    <html lang="ko" style={{ scrollbarWidth: "none" }}>
      <head>
        <meta charSet="UTF-8" />
        <link rel="icon" type="image/svg+xml" href="/public/cocos2.svg" />
        <meta name="viewport" content="width=device-width, initial-scale=1.0" />
        <title>코코스</title>
      </head>
      <body>
        <div id="root">{children}</div>
        {/*<div id="root"></div>*/}
        {/*<script type="module" src="/src/main.tsx"></script>*/}
      </body>
    </html>
  );
}
4. Next.js에서는 meta charset과 meta viewport 태그는 이미 포함되어 있습니다. <head> 태그에 있는 값을 지워도 됩니다.
import { ReactNode } from "react";

export default function RootLayout({
  children,
}: {
  children: ReactNode;
}) {
  return (
    <html lang="ko" style={{ scrollbarWidth: "none" }}>
      <head>
        {/*<meta charSet="UTF-8" />*/}
        <link rel="icon" type="image/svg+xml" href="/public/cocos2.svg" />
        {/*<meta name="viewport" content="width=device-width, initial-scale=1.0" />*/}
        <title>코코스</title>
      </head>
      <body>
        <div id="root">{children}</div>
        {/*<div id="root"></div>*/}
        {/*<script type="module" src="/src/main.tsx"></script>*/}
      </body>
    </html>
  );
}
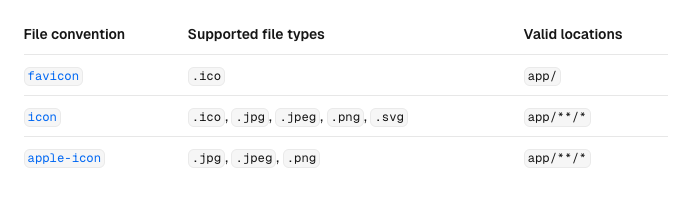
5. favicon.ico, icon.png, robots.txt와 같은 메타데이터 파일을 app 폴더 바로 아래에 두기만하면 <head> 태그에 자동으로 추가됩니다. 지원하는 모든 파일을 app 폴폴 옮겼다면 <link> 태그 역시 지워도 괜찮습니다.
import { ReactNode } from "react";

export default function RootLayout({
  children,
}: {
  children: ReactNode;
}) {
  return (
    <html lang="ko" style={{ scrollbarWidth: "none" }}>
      <head>
        {/*<meta charSet="UTF-8" />*/}
        {/*<link rel="icon" type="image/svg+xml" href="/public/cocos2.svg" />*/}
        {/*<meta name="viewport" content="width=device-width, initial-scale=1.0" />*/}
        <title>코코스</title>
      </head>
      <body>
        <div id="root">{children}</div>
        {/*<div id="root"></div>*/}
        {/*<script type="module" src="/src/main.tsx"></script>*/}
      </body>
    </html>
  );
}
지원하는 모든 파일은 다음과 같습니다.
6. Next.js는 <head> 태그를 Metadata API를 통해 관리할 수 있습니다. 남아있는 메타데이터 정보를 metadata 객체로 옮겨줍니다.
import { ReactNode } from "react";
import { Metadata } from "next";

export const metadata: Metadata = {
  title: "코코스",
  description: "반려동물 증상을 겪는 반려인들이 고민을 공유하고 병원 정보를 확인할 수 있는 서비스",
};

export default function RootLayout({
  children,
}: {
  children: ReactNode;
}) {
  return (
    <html lang="ko" style={{ scrollbarWidth: "none" }}>
      {/*<head>*/}
      {/*<meta charSet="UTF-8" />*/}
      {/*<link rel="icon" type="image/svg+xml" href="/public/cocos2.svg" />*/}
      {/*<meta name="viewport" content="width=device-width, initial-scale=1.0" />*/}
      {/*<title>코코스</title>*/}
      {/*</head>*/}
      <body>
        <div id="root">{children}</div>
        {/*<div id="root"></div>*/}
        {/*<script type="module" src="/src/main.tsx"></script>*/}
      </body>
    </html>
  );
}
위의 변경 사항을 통해 모든 것을 선언하는 것에서 index.html프레임워크에 내장된 Next.js의 컨벤션 기반 접근 방식( Metadata API )을 사용하는 것으로 전환했습니다. 이 접근 방식을 사용하면 페이지의 SEO 및 웹 공유성을 보다 쉽게 개선할 수 있습니다.
5단계: 엔트리포인트 페이지 만들기
Vite 앱에서는 main.tsx 파일이 엔트리포인트(진입점) 역할을 합니다.
Next.js에서는 page.tsx 파일이 동일한 역할을 합니다.
-> 충돌을 막기 위해 Next.js 의 파일 시스템 기반 라우팅 방식으로 완전히 전환하기보다, 점진적으로 진행하기 위해서 다음과 같이 구현하고자 합니다.
app 폴더에 pages.tsx 파일을 만들고 아래와 같은 내용을 정의합니다.
'use client'

import dynamic from 'next/dynamic'
import '../index.css'

const App = dynamic(() => import('../App'), { ssr: false })

export default function Page() {
  return <App />
}'use client' 라는 선언을 통해 클라이언트 컴포넌트로 정의되었다는 사실을 알 수 있습니다.
이 선언이 없다면 <Page> 컴포넌트는 서버 컴포넌트로 동작합니다.
Next.js에서 클라이언트 컴포넌트는 브라우저로 보내기 전에 서버에서 HTML로 미리 렌더링됩니다. 점진적인 마이그레이션을 위해 <App> 컴포넌트가 서버에서 미리 렌더링되는 것을 막아둬야 합니다. 서버에서 HTML로 미리 렌더링할 수 없는 컴포넌트가 존재할 수 있기 때문입니다.
또한, 코드에서 볼 수 있듯이
dynamic 함수의 ssr 옵션을 false로 정의해 <App> 컴포넌트가 서버에서 렌더링되지 않도록 합니다.
6단계: 정적 이미지 가져오기 방식 수정하기
Vite에서는 정적 이미지를 가져오면 이미지의 URL이 문자열로 반환됩니다.
이 객체는 Next.js의 <Image> 컴포넌트와 함께 사용하거나 <img> 태그의 src 프로퍼티에 사용할 수도 있습니다.
<Image> 컴포넌트로 변경하면 최적화 등에 이점이 있지만 이 역시 점진적인 마이그레이션을 위해 나중으로 미루겠습니다. <img> 태그를 이용해 이미지 가져오기 방식을 수정하겠습니다.
1. public 폴더로부터 가져오는 절대 경로로 지정된 이미지 경로를 상대 경로로 변경합니다.
// Before (Vite)
import logo from '/logo.png'

// After (Next.js)
import logo from '../public/logo.png'2. src 프로퍼티에 객체를 전달하는 대신 src 값을 전달합니다.
// Before (Vite)
<img src={logo} />

// After (Next.js)
<img src={logo.src} />
7단계 : 환경 변수 마이그레이션하기
Vite에서는 import.meta.env라는 특별한 환경 변수를 지원합니다. 해당 객체는 Next.js에선 지원하지 않기 때문에 아래와 같이 변경해야 합니다.
- import.meta.env.VITE_ ⇒ process.env.NEXT_PUBLIC_
- import.meta.env.MODE ⇒ process.env.NODE_ENV
- import.meta.env.PROD ⇒ process.env.NODE_ENV === 'production'
- import.meta.env.DEV ⇒ process.env.NODE_ENV !== 'production'
- import.meta.env.SSR ⇒ typeof window !== 'undefined'
Next.js는 BASE_URL 환경 변수도 제공하지 않습니다. 하지만 필요한 경우 환경 변수를 구성할 수 있습니다.
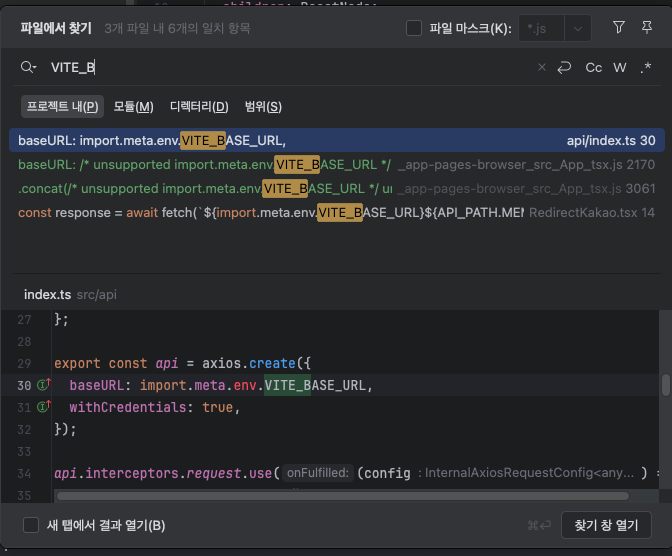
이렇게 파일에서 찾기로, 쓰고 있는 부분을 수정해주었습니다.
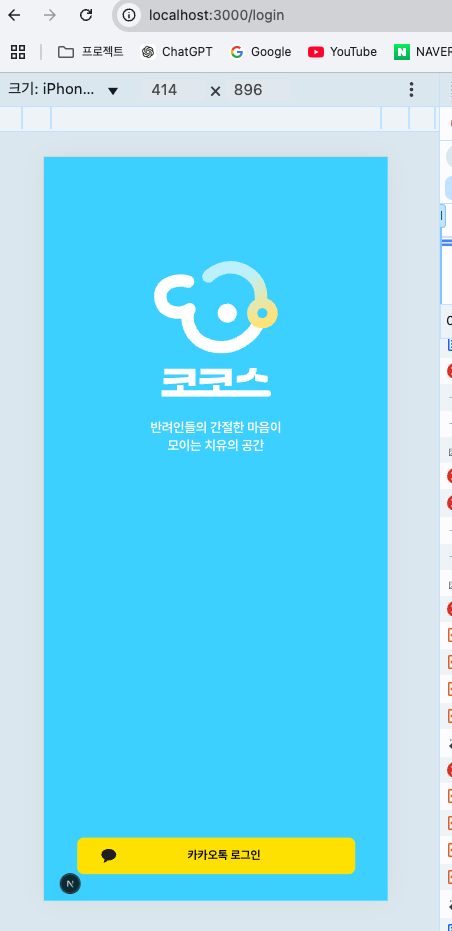
이렇게 화면이 잘 뜨는 것을 확인 할 수 있었습니다!
마이그레이션은 되긴 했지만, 사실상 ssr 의 기능을 false 로 해두고 이전에 렌더링하고 있던 Vite 의 App 만 가져와서
화면에 보여주는 형식으로 구현이 된 것이기 때문에
다시 Next.js 의 App router 폴더 구조를 갖추도록 구성해야 합니다. 그래야 ssr 의 특징을 가져와서 성능적인 면을 살릴 수 있기 때문인데요. 그래도 여기까지 잘 왔으니, 화면도 잘 나오는 것을 확인했으니 이제 할 일은.. 페이지 이전 작업입니다..!
'WEB' 카테고리의 다른 글
| [Architecture] 모놀리식 아키텍쳐 vs 마이크로서비스 (0) | 2025.04.03 |
|---|---|
| [WebApp] Dart package 오류 (0) | 2025.03.01 |
| [WEB] CSR vs SSR 차이 및 특징 ( + SPA, MPA ) (1) | 2025.02.15 |
| [WEB] React-Query Mutation, invalidateQueries (0) | 2025.02.14 |
| [WEB] ♻️ 데이터 페칭 SSR (0) | 2025.02.11 |